Jeanette - Off The Cuff

My photo
My name is Jeanette, and I was born in Sweden. I've been a life long artist, and designer, who took a plunge into surface pattern design in 2022, currently selling at Spoonflower and Raspberry Creek.

Wednesday, January 12, 2011

Beef & Mushroom pie

Mushroom-beef-pieThis is another amazingly simple and delicious dish my mother has been making for years, and who knows where she got the recipe originally.  But given her stack of vintage cooking magazines from the early 1970s and on, there is probably a source somewhere.   However, I don’t know the source, and she probably barely remembers where it came from herself, since she has been making it for decades.
I was in a hurry when I made this, having painted all day at my in-laws’ house, so I used a store-bought crust to expedite it all.  Otherwise, feel free to use the pie crust recipe of your choice.  It’s a pretty standard butter, flour, cold water type of crust.

Potato Mushroom Pizza

Potato-Mushroom-pizza (19) The first place I ever had a potato pizza was at the famed Vic's Pizza in Olympia while I was in college. I just don’t go out much these days, being the frugal housewife that I am, so I finally got around to making my own potato pizza.  And seriously… don’t knock it till you try it.  It’s SO good.
Mine, of course, has its own tweaks and variations, and I worked with the ingredients I had on hand—this week, my theme seems to be food with mushrooms.   You’ll see two other mushroom-inclusive recipes in the next 2 installments as well.

Sunday, January 9, 2011

Mole Pulled Pork Tacos & Spanish rice

Happy New Year, readers.  Did you miss me? All four of you?

I haven’t blogged for a while, because as much baking & cooking as I did during Christmas it was all Christmas food, with Swedish recipes, and I don’t know how many of you really want a recipe for pickled-herring and beet salad?

Plus I just didn’t cook a lot of new stuff in the busyness of the Christmas season.  Most of the food I made had already been entered on the blog.  But it’s a new year, and I’m hoping to have a few more recipes up my cuffs.

I made this meal yesterday, and mostly made it to deliver to a family from our church that was recovering from a rather major car accident, and in my haste to make the food, I didn’t even think of blogging it, let alone photographing my progress.  So this will be mostly from memory, and you’ll just have to use your imagination.  And you know what pulled pork looks like.

[PS. This was edited a year later after the original posting to adjust the ingredients, because I made it again today and it was even better than the first version.  So here it is -- updated.  Please note that this is still by no means a fully authentic recipe.  At least it's a good pseudo recipe for the harried (or hairy) housewife.]

Friday, November 19, 2010

Mandarin Ginger Glazed Mahi Mahi

11-2010 006I almost always keep a bag of mahi mahi filets in the freezer, because, well, you can't get fresh Mahi Mahi unless you live in Hawaii, I'm pretty sure.  And I do really like it.  Since I didn't feel like going out to grill this, I made a pan-fried dish, with an Asian-inspired truly off-the-cuff marinade.

Thursday, November 18, 2010

Acorn Squash Soup

11-2010 007 The weather here has been downright stormy, blustery and rainy this week.  It is definitely soup weather, and all I could think of today was a big pot of squash soup.  I had a big acorn squash (a rather large one—easily the size of a small melon) and recently I learned, thanks to The Pioneer Woman's spaghetti squash recipe, that a squash does NOT have to be steamed or even cut up to be perfectly roasted.  In fact, it’s so amazingly caramelized and delicious when leaving the whole squash intact while roasting it.  Another bonus of this method is that you don’t have to risk life and limb hacking into a round, rolling, rock-hard squash with a kitchen knife.
I have seen and tried and perused a variety of squash soups, (this one for instance looks really good, too:  Butternut Squash Soup with Sage) and thought I would experiment with some other spice-combinations.  I kept it very simple with the ingredients so that I just let the savory squash do it’s own talking.
So here goes!

Monday, October 25, 2010

Pork Stir Fry

PORK STIR FRY 009I just threw this together last night.  I can’t say anything for its authenticity (as you have discovered to be the theme of my blog, being Off The Cuff) but it was pretty tasty, so I thought I’d share the gist of it.


"Confetti" Meatloaf

I made this meatloaf out of ground turkey a few weeks ago, and apparently I completely forgot to post this to my blog.  So here goes... um... from memory.  


Friday, October 1, 2010

Pasta with Chanterelle cream sauce

chanterelle-pasta (1) When I was a little girl in Sweden, we went out in the woods to pick Kantareller (or Chanterelles).  They peeked out of the moss and pine needles, like little golden trumpets in the woods.  They were so delicate and buttery in flavor, especially when sautéed in butter!  Fresh chanterelles are hard to find, as they are seasonal, and cannot be cultivated.  They seem to only grow in the wild, and only where they choose, but they seem to prefer evergreen forest conditions.  About once a year, there is a 4-5 week time frame when I can find these golden fungi at the grocery store or farmer’s market, but usually at a cost of $28-30 a pound.  CostCo sometimes has them, and then it’s more like $10-12 a lb, which is much better than $28 a pound. But still, pricey.

So imagine my delight when I heard through the grapevine that a girl from our church lived near a wooded area that seems tochanterelle-pasta (2) have prolific Chanterelle growth every fall.  Sure enough, I went out there this morning for about an hour or so, in my rubber boots, and carefully meandered around the woods behind her yard.  Carefully, since the mushrooms often were tucked underneath the moss & leaves, and even though brightly colored, they often just blend in with the autumn foliage on the ground. As soon as my ‘chanterelle eyes’ became accustomed to looking beyond and underneath the camouflage hiding these little gems, I started finding dozens and dozens of them, ranging in size from 1/2” in diameter to several inches wide.

I picked almost a whole grocery bag worth. And now that I have had my dinner, I thought I’d tell you what one of my favorite chanterelle-based meals is.

INGREDIENTS:

1-2 cups worth of chopped chanterelles – brush off dirt and debris with a pastry brush chanterelle-pasta (3)
2 tbsp butter
1/2 tsp salt
1 sprig fresh rosemary, de-stemmed, and finely chopped up (probably about 1 tsp of dried rosemary)
3-5 large sage leaves, finely chopped up (I suspect it would be about 2 tsp worth of dried sage)
1-2 tbsp flour
1/2 cup- 3/4 cup heavy cream

Sauté the mushrooms in the butter, until soft, and then sprinkle flour over them, and stir it in until absorbed.  Pour cream, and herbs and seasonings in, and allow to simmer over low heat until the cream thickens a bit from the flour.

Meanwhile, prepare your favorite type of pasta according to directions, and drain it.  Stir in the cream sauce over the pasta.

This pasta is particularly delicious when served with grilled poultry, such as turkey breastschanterelle-pasta (4) or chicken.  I had chicken tenderloins (because I always have them in my freezer) so I defrosted them, marinated them with olive oil, sage, rosemary, salt & pepper (probably about 3 or 4 sage leaves, minced, 2 sprigs of rosemary, chopped up, 1/2 tsp salt, and 1/2 tsp ground pepper) and grilled them on a very hot grill for about 2 minutes on each side.  Then I cut the chicken tenders into bite-size pieces and stirred them in with the pasta.   I have also served this with chicken breasts stuffed with brie, and made a similar sauce to drizzle over grilled turkey breast.  Roasted rock hens are also excellent with chanterelles. 

chanterelle-pasta

The chanterelles are so delicate in flavor that you really don’t want to overpower them with a lot of other flavors or heavy meats.  I stick with sage, and rosemary as the only real seasonings. I don’t use onions or garlic with chanterelles, because just a couple of woodsy herbs are enough of a good complements, and the cream sauce just enhances it all.


Sunday, September 5, 2010

Cordoba beer-battered eggplant with honey (Berenjena Con Miel)

This is a tapas-style delicacy that I first ate while vacationing in southern Spain, in the city of Cordoba.   It is called Berenjena Con Miel in Spanish, and I had it there, in a restaurant called Casa Pepe De La Juderia (The House of Pepe in the Jewish Quarters)  It would be no exaggeration to say that I completely pigged out on this deep fried battered eggplant dish, and for years, tried finding a similar recipe online, but not knowing for certain if I was making it right. 
I eventually remembered to contact my friend in Spain, whose brother gave me some approximates, and then I found an actual Spanish recipe online, which I translated a bit, and experimented some with.  This is the closest I’ve come to that magical dish I had once, ten years ago in 2001.  It is probably not exactly like the one at the restaurant, but it’s really good anyway. (Updated with new photos Sep. 2011)


Ingredients for Beer Batter:
1 1/4 cups white flour
1/2 – 3/4 bottle of beer – enough to make the batter the consistency of pancake batter. (*I used Alaskan Summer, and find that amber beer lends the most caramel-like flavor to the batter * )
1/2 tsp baking powder
1 tsp paprika
1 clove minced garlic
Salt and pepper (a pinch of each)

Ingredients for Egg-dip:

1 egg
1/4 cup milk
salt and pepper

Bowl of white flour for dredging
 

1 large Eggplant, thinly sliced (which makes bigger discs) or two narrow Asian-style eggplants
 
Make the batter first, by mixing all ingredients in a medium sized bowl, and let it sit for an hour.


Meanwhile, peel and thinly slice the eggplant.  Each disc should be no more than 1/3” in thickness.


Spread the discs out on a large cookie sheet, and salt both sides.  Let the salted eggplant sit for about 30 minutes, and then rinse each disc well (you’ll see brown liquid forming on the eggplant as it’s drawing out bitterness and moisture.)  Dry each slice of eggplant with a paper towel, before deep frying.


Preheat your oil (whether in a deep fryer or deep skillet) to medium hot.  This takes a little fine-tuning and I usually do a couple of test slices in the oil first.

Whisk the egg dip in a small bowl, and soak each slice in the egg  and milk mixture, and then dredge in flour, which helps hold the batter on the eggplant.  If you skip this step, the batter will just slide off and end up in clumps in the hot oil.  Lastly, dip it in batter until well coated, but not too thick.  Let the excess drip off before you put it in hot oil.


 The frying process takes a bit of time so I usually line up another cookie sheet with a couple of layers of paper towels next to my deep fryer to place each slice there … they can be kept hot in the oven at 250 degrees while you’re making the rest.  They usually stay fairly hot even if you don’t put them in the oven, if you work fast, and orderly.  If you don’t own a deep fryer, you can certainly cook them in a deep skillet with about an inch of canola or olive oil in it. Be sure to let the eggplant get golden brown on one side before flipping it over.
 
Serve hot with honey drizzled over the top.  The honey really adds an extra element of amazing!


Spring Rolls

spring rolls (3) (Edited on 02/16/2011 for additional optional ingredients & alternate soaking directions).

Maybe it is the pressure of being challenged to do new things in my cooking, as spurred on by this food blog, but wandering down the Asian food aisle, I think was what inspired me to buy the rice-wrappers for spring rolls.  I love so many Asian dishes, but sometimes it just simply doesn’t occur to me to make them myself.  That was my incentive to change things up, and make something new.
I always enjoy eating the spring rolls at restaurants, and realize there is no hard and fast rule as to what should go in them. 

My process came with a steep and fast learning curve.  For instance, those little wrappers are delicate, so I have learned that the kind of lettuce I had on hand was way too stiff to be rolled up without tearing the wrappers up. A few of them had to be double wrapped to be contained properly.
spring rolls 
INGREDIENTS:
1 package spring roll rice-wrappers
1/4 package rice vermicelli / rice sticks (i.e., pad thai noodles) OR
1/4 package "glass" noodles (they will have different thicknesses / textures so experiment with which type you prefer)

The first step, depending on the type of noodle, can take up to 30-40 minutes.  So check the soaking directions on your noodle package, and get a large skillet out, and pour about 2 cups of water in it… heat it up until boiling, turn the heat off, and then soak the rice noodles in it until soft—usually about half an hour.  After that, rinse them in a colander in cold water to get excess starch off.  Let them sit in the colander in the sink to drain.
spring rolls (1) 
Filling suggestions:
In this batch, I used the following--
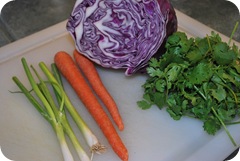
cilantro
basil
carrots
red cabbage
green onions
rice noodles
lettuce (butter lettuce would probably work better than what I had, because it’s softer and rolls up better)
Other tasty ideas would be fresh bean sprouts, red bell peppers, cucumber or zucchini, endives….

spring rolls (2)While your noodles are soaking, wash and mince your herbs, wash, peel and finely sliver or julienne all the veggies length-wise for easiest assembly.  Leave each veggie in a separate pile on your cutting board so you can assembly-line the … uh… assembly.  (That’s a whole lot of assembling there.  But I guess that is where the art-form is inherent. My spring rolls—not so much! Yet.)
 
Simultaneously pour some fresh water into your large skillet, and heat it up, and then shut the burner off.  Use this hot water to soak your rice wrappers for 15-20 seconds each.  Lay out a clean and wetted tea towel on your countertop, and when you pull your moistened rice wrapper out of the skillet, carefully spread it out on the tea towel, and dab off the excess moisture if necessary.

Next, place a lettuce leaf in the center of a rice wrapper, topped with about 1/4 cup of rice noodles, and arrange a pinch of all the vegetables in a stack, leaving about 1 1/2 inches on the ends, plus enough on the sides of the wrapper to roll it up like a burrito.  Except it is a spring roll.  Not a burrito.

Finally, fold the short ends of the wrapper into the middle, grab one of the long sides, and gently, gently roll it together.  The rice wrapper should be sticky enough to seal itself.  If you have never had these before, they are served cold, so they make a good side dish for a hot protein, or an appetizer, or – as my husband said – a portable salad!

Serve with your favorite satay peanut sauce, or as I did, Mae Ploy Sweet Chili Sauce, 25-Ounce Bottle (Pack of 2) which is The Goodness in dipping sauce.